Tuesday, December 31, 2013

Something New Challenge #150

I hope you all had a wonderful Christmas and I wish you a Happy New Year.

I recently got back from Mexico and a wonderful honeymoon, some photos of that will be posted sometime soon. But before that it is time for another challenge over at SweetStamps.com, the theme this time is "something new". I didn't have time to make video for this card, but I'll make sure to post some new videos very soon.

For making this card I used a cute bird stamp and a sentiment from SweetStamps together with my Copic Markers and some Liquid Pearls. Hope you like it.

And as usual you can join the fun and win some great prizes. Make sure to visit the SweetStamps blog for more information and the complete Challenge Rules.


Products from SweetStamps.com used on this card:

Monday, December 30, 2013

Mexico - Dec 2013

Ja då var man tillbaka från värmen i Mexiko. Visserligen hade vi oturen att få rätt dåligt väder och det regnade mestadels av tiden, men det var trevligt ändå. Vi lyckades i alla fall få några dagar i solen och lite bad i havet blev det allt.

Även om vi inte har så många bilder så kommer jag att visa upp några av de vi tog i alla fall. Håll koll inom de närmsta dagarna för lite mer eller mindre fina bilder. Börjar i alla fall med att visa upp en av de leguaner som bodde på vårt hotell.

Hoppas alla hade en ritkigt trevlig jul och såhär dagen före nyårsafton vill jag såklart passa på att önska alla ett gott nytt år också.

--------------------

Back from Mexico and a fabulous honeymoon. I didn't take that many photos on our trip, but the ones I took will be posted here on the blog beginning today. 


Tuesday, December 17, 2013

Glitter Challenge #148

It's Tuesday again and time for another weekly challenge over at SweetStamps.com. This week the theme is Glitter and I tried a bit of different technique for me this time.

I used Glossy Accents and some glitter that I had laying around and used a Medallion die as a mask when applying the glue. Then I added the glitter and hoped that it would stick. I did warp the paper a little bit too much though, but the glitter is staying in place. 

Then I die cut another piece of the die and adhered the positive side to the glitter and the negative side with some foam squares. I realized that I messed up a bit when trying to align the cutout with the glittered image, but I didn't bother to redo the whole thing. Things don't have to be perfect.

As usual you can join the fun. Make sure to visit the SweetStamps blog for more information and the complete Challenge Rules.


Products from SweetStamps.com used on this card:

Sunday, December 15, 2013

Monthly Technique Challenge - Easel Card

It is time for a new monthly technique challenge over at SweetStamps.com today and since I am somewhere in Mexico right now I have made my card in advance and have scheduled this post. This week the theme is Easel Cards and this yet another technique I have never tried before. I couldn't find any measurements on the Internet to help me make this card so I just tried my best to make something that would work. I realized when I was done that I made the "folded pieces" too small and my card doesn't stand as upright as I would like, but it still worked out and I am pretty happy anyway.

As usual you can join the fun. Make sure to visit the SweetStamps blog for more information and the complete Challenge Rules.

Products from SweetStamps.com used on this card:

Tuesday, December 10, 2013

Simple Christmas Challenge #147

Right now I am probably on a plane somewhere over the Atlantic ocean on my way to Mexico. So obviously this post is scheduled in advance. We are on our honeymoon and we'll be back sometime after Christmas. Hopefully we'll have a great time.

And since it is Tuesday today it is time for a new challenge over at SweetStamps.com. This week the theme is Simple Christmas.

I used a foam blending tool to make a bit of a night sky using some Distress Inks. Then I cut out a mask using the beautiful deer and used Black Soot to color it. I finished of this simple card with sime dots of Liquid Pearls to make it look like stars or snowflakes. Hope you like it.

As usual you can join the fun. Make sure to visit the SweetStamps blog for more information and the complete Challenge Rules.


Products from SweetStamps.com used on this card:

Tuesday, December 3, 2013

Red & Green Challenge #146

It's Tuesday again and time for another challenge over at SweetStamps.com. This week the theme is Red & Green and that ofcourse made me think of Christmas again. So I made a Christmas card using these colors and a great stamp set with some cute birds.

I stamped my image on creme cardstock and colored it with Distress Markers. To make it a bit more dimensional I stamped and cut out one of the birds and did some paper piecing. I also added some glitter to the card. I mean how can you not use glitter for Christmas?

As usual you can join the fun. Make sure to visit the SweetStamps blog for more information and the complete Challenge Rules.


Products from SweetStamps.com used on this card:

Tuesday, November 26, 2013

The Holidays Challenge #145

It is time for another challenge over at SweetStamps.com and this time the theme is Holidays. Since it is close to Christmas I of course made a card with a bit of a "christmassy" feeling.

I used some Red Dylusions Spray Inks, Green Color Wash Spray and some Perfect Pearls Spray ink plus some red Stickles to make this card. I also used the negative of a SweetCuts Die to keep the splatter in a somewhat regular shape. Hope you like the card.

As usual you can join the fun. Make sure to visit the SweetStamps blog for more information and the complete Challenge Rules.

Products from SweetStamps.com used on this card:

Monday, November 25, 2013

Finally!

Äntligen har Adezza löpt och det kanske är kattungar på gång. Förhoppningsvis blir det kattungar i början på januari, närmare bestämt vecka 3.Om du är intresserad av en kattunge i denna kull är du välkommen att höra av dig till mig. Kolla gärna in hemsidan för mer information också.
S*Amun Ra's Ragdoll - www.amunra.se

-----------------------------  

My cat Adezza has finally been mated with Ramses. I have waited for Adezza to come in to heat since June and it has been a long wait, but now finally! If all goes well she will deliver her kittens in the beginning of January, can't wait.


 2080827 P1195057

Wednesday, November 20, 2013

10 minute craft dash - Uniko Studio

Today Uniko Studio is sponsoring the 10 Minute Craft Dash over at Pretty Pink Posh. The 10 minute craft dash is a challenge where you should attempt to make a card in 10 minutes or less using the color inspiration provided.


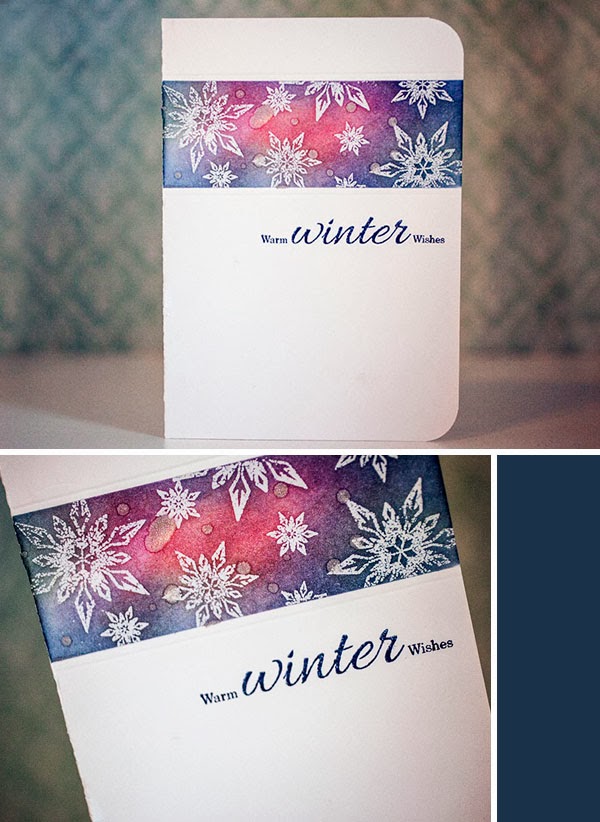
I made a card using the new Stunning Snowflakes from Uniko Studio and some nice colors of Distress Ink and embossing powders. A fast an easy card that I made in just 7 minutes and 2 seconds. 

By joining this challenge you also have the chance to win a £15 Gift Certificate to use in the Uniko Studio store. So get ready and start crafting!


Uniko Studio Products used:

Tuesday, November 19, 2013

Winner Uniko Studio

Today I want to announce the winner of the Uniko Studio Blog Hop and since my favorite stamp set was the BRIGHT Butterflies Set, this is also what the winner from my blog will get. 

So I asked random.org to draw a winner from the comments on my blog and the lucky number is 2.

That means Jane is my winner of the BRIGHT Butterflies Stamp Set. Please contact Beverely by emailing her: beverley [at] unikostudio.com.

Congratulations and a big thank you to all of you who commented on my blog post. I appreciate all of your nice comments and I am really happy you liked my card. 

Anything Goes Challenge #144

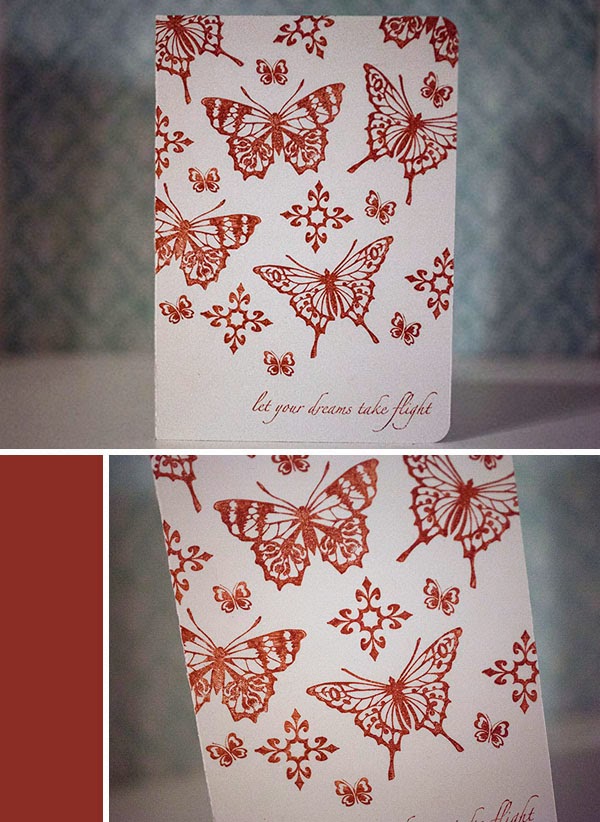
It is time for another challenge over at SweetStamps.com again and this time the theme is Anything Goes. I made a pretty fast and easy one layer card this time using some favorite butterfly stamps.

Hope you like it.

As usual you can join the fun. Make sure to visit the SweetStamps blog for more information and the complete Challenge Rules.


Products from SweetStamps.com used on this card:

Tuesday, November 12, 2013

Thanks Challenge #143

Today I have made a card for this weeks challenge over at SweetStamps.com and the theme is Thanks.

I started by cutting my patterned paper into triangle shapes and glues them onto a piece of cardstock. Then I stamped my flower image on top of everything and colored the image with some Wink of Stella pens. To get a little more dimension to the card I stamped the image one more time on some white paper and colored the flowers with Copic Markers and cut them out.


After I had adhered the cut out flowers to the card I stamped my sentiment and added all of the embellishments before I finally colored the edges and adhered the piece to my cardbase. I colored the edges with Black Soon Distress ink to get that "imperfect" look. Then I drew some faux stitching lines around the edge and the card was finished.


As usual you can join the fun. Make sure to visit the SweetStamps blog for more information and the complete Challenge Rules.

I also entered this card into the following challenges:

CAS(E) this Sketch! 

Products from SweetStamps.com used on this card:

Monday, November 11, 2013

Simply the best

Denna månad har vi i designteamet hos Uniko Studio fått välja våra favoritstämplar och göra ett kort med dessa. Det var inte alls svårt för mig att välja min favorit då jag verkligen gillar de vackra fjärilarna i BRIGHT Butterflies. Så här kommer ett kort som jag har gjort med dessa stämplar.

------------------

Today we are revisiting some old stamp sets over at Uniko Studio and the design team all chose their favorite stamp set to work with this month. Of course I had to choose my all time favorite BRIGHT Butterflies. I just love these great butterflies and the matching die set.

This was a very fast and simple card as usual and I hope you like it.


http://unikostudio.blogspot.se

Don't forget to hop along and take a look at the rest of the posts and projects in this amazing blog hop. Next up in the hop is Gayatri with some gorgeous tags she made with the Poinsettia stamp set, so visit her blog to check them out. 

And be sure to comment along the way! Each of us in the design team and Beverly are giving away a prize, so enjoy the inspiration and comment for a chance to win on all of the blogs.

Bev (UnikoStudio)
Aimes
Amber
Erika - you are here
Gayatri
Nicki
Ren-Yi
Stacey
Taheerah

Guest DT Oct/Nov
N@Ali 

Uniko Studio products used:

I also entered this card into the following challenges:
CASE Study Challenge #165 
Simon Wednesday Challenge

Wednesday, November 6, 2013

My Craft Room

Idag tänkte jag lägga upp ett inlägg som kanske är lite tråkigt att kolla igenom för en del, men det är många som har efterfrågat ett inlägg hur det ser ut på mitt kontor. Så här kommer en bildkavalkad från mitt rum.

----------------------

I have had a few request about showing what my craft room looks like and I have finally taken the time to photograph the room. So here is a short "walk through" in my craft room/office.

Here is a view of my room from where I enter the room. In the front you can see my two Råskog carts where I store my Project Life materials and my Art Journaling stuff. 

Next to the carts are my work desk where I stand. In the different boxes under the desk is some materials and tools that I use a lot while crafting.

And to the right of my desk (which is in the center of the room) is a shelf unit where I store some random stuff and my albums.

Here is a closeup of my Project Life Cart:


And here is a closeup of my Art Journal cart:


Here is a photo of the shelf unit (Expedit from IKEA) where I store my albums, some random stuff and things I have an extra copy or two of.


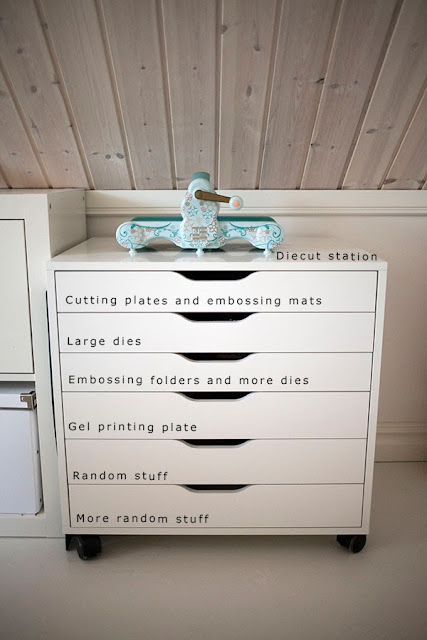
Next to the Expedit unit I have an Alex drawer unit. I use this as my die cutting station:


On the left side of my work desk I have another Expedit unit on top of a drawer unit. Here I store my most used cardstock, Tim Holtz stamps and some other random stuff. I also have a few binders with different inventory solutions so I can easily keep track of the stuff I own. In the blue boxes I store stencils, alphabet stickers and other stickers. I also have some extra albums here that didn't fit in the other shelf.


Inside the top drawers I store all of my chipboard pieces and alphabets:


In the left drawer I store my clearstamps and my thin dies. I use Avery Elle stamp storage pockets to store my stamps. They are sorted in alphabetical order and by company, but I still need to make dividers for them. The dies are stored by theme in plastic CD pockets. I also store my clear blocks in this drawer:


In the bottom left drawer I just store some random stuff that didn't fit anywhere else. I still need to sort through that drawer and do something with it. I didn't take a picture of that since there is nothing to see except a mess of patterned paper scraps mixed with all sort of random stuff that can be found around a house.

In the right middle drawer I store some stamps from gel-a-tin since I didn't want to remove them from their tins and put them in storage pockets. I also store my inks, stamp cleaners and other often used stuff in there. Here is a closeup of the drawer:


The final drawer in this unit is used to store stamp inks and reinkers:


Here is the office part of my room and this is where I spend the most time. Here I have my computer, my printer and all of the office and gaming related stuff that I need for work and for gaming. (I play loads of computer games).


On the right side of my computer is my printer and my Silhouette (yes I do have the first one they released, but it works just fine). In the drawers and cabins underneath is stuff for my computer and all of the office supplies and gaming equipment. (I still haven't had the energy to put the handles on the doors and drawers, but I'll get there eventually).


On the left side of the computer is a spot for my sewing machine. This is also where I take all my card photos.


In the corner is a shelf unit with this spinning wheel in it. I store random embellishments and extra Project Life cards here.


Ok, so lets turn around and face the door where we entered the room. Here you can see my work desk from the other side and here I have two chair where I can sit and work and have friends over. I also covered my desk with paper so I don't ruin the desktop when painting. I'll paint the top of the desk with the same color I have on the floor when I get the time. Here you can see my somewhat temporary Copic Marker storage too.


I store my Copic Markers in old (clean) cat food containers. They are sorted by color.


Closest to the door is an old shelf unit that we had in out living room before. I "stole" it and now I use it to store some random items and extra materials that I have. I also have two DVD units next to it where I store all of my cling mounted stamps (except the Tim Holz ones which I store in the large Expedite shelf).


In the bottom cabin I store extra journals, all of my papers, materials for shipping and some extra cardstock.


And finally I have a small shelf next to my door where I store my stickles, liquid pearls and Distress Markers and other colored pens. (Yes I did spell liquid wrong on the photo, no idea where that e came from. Sometimes my hands work faster than my brain.)


So that was my craft room and a seriously long post, but I hope you liked it.

Tuesday, November 5, 2013

Nature Challenge #142

Today I have made a card for this weeks challenge over at SweetStamps.com. The theme is Nature and I used a beautiful bird stamp and the sentiment that comes in the pack. 

I stamped the image with black ink on a piece of white cardstock and then I colored the image with some regular colored pencils. I wanted the image to have very muted colors and I just lightly colored it to get that subtle coloring. I then used some red Stickles to get some glitter and extra interest to the card. I colored the edges with black ink and matted the cardstock on a piece of black crdstock to get a small frame. The cardbase is a deep red cardstock from Bazzill.  The sentiment is sold together with the bird stamp and I embossed it in white on the same cardstock as I used for the cardbase. 


As usual you can join the fun. Make sure to visit the SweetStamps blog for more information and the complete Challenge Rules.


Products from SweetStamps.com used on this card:

Monday, November 4, 2013

Frames Challenge #141

This post is a little late due to some problems with my Internet connection.

This card should have been posted in Tuesday since that was the day for the new challenge over at SweetStamps.com. This time the theme was Frames and I made a card without a sentiment this time.

I used Dylusion Spray Inks, Colorwash spray and Perfect Pearl Mists to make the background. Then i stamped on the background with a few of the ArtsyFartsy cling stamps and in the end I cut of a strip of the sprayed background and put it on top together with some dark red ribbon to make a frame. Well, I made a quarter of a frame anyway.


As usual you can join the fun. Make sure to visit the SweetStamps blog for more information and the complete Challenge Rules.


Products from SweetStamps.com used on this card:

Saturday, October 26, 2013

October Release - Uniko Studio

Today we can finally reveal all of the great stamps and dies in the October release at Uniko Studio. There are some great stamps in this release and I have had so much fun creating with them.

I'll show you two cards today and I also made a video for both these cards and you'll find them in the bottom of this post as usual or at my YouTube Channel.


For my cards I focused mainly in the new snowflake die, which I love by the way. My cards are very simple, but I do think that this beautiful die is enough.


So here's the first card:


And here is my second card made with nothing but the die, distress inks and a sentiment stamp.


So that was all I had for today, and I hope you liked the new release and don't forget to check out the Uniko Studio Blog and the rest of the design team blogs for more cards using the new release.

Uniko Studio Blog (Bev)
Aimes
Amber
Erika - you are here
Gayatri
Nicki
Ren-Yi
Stacey

YouTube Video of card number 1 and a short product introduction:


I didn't manage to get the voiceover to work on the next video, so I just fast forwarded it and added some music. So it may not be the best tutorial, but atleast you can see what I did.
YouTube Video of card number 2:

Friday, October 25, 2013

Introducing - Uniko Studio Jolly Christmas

After some major issues with the post office refusing to deliver the package with my stamps I can finally share some products from the upcoming release. I have to say I totally love the new release and I can't wait to start using all of the stamps and dies.

Today we are introducing a very special and fun set that includes a super adorable Santa called Jolly Christmas. I love this cute little man so I just had to use him for my first card. And since I missed out on the fun this week I ended up using stamps from three of the new sets. So on my card today you can see a glimpse of the new Background Builders set as well as the new addition to my favorite collection All Occasion Sentiments.

I colored the image in a bit of an unusual way, atleast for me. I used my Distress Markers to color the image, but instead of using them with water I just used them as regular markers. So there is no blending, just plain colors put down on the image, just like I did in kindergarten.

After the image was colored I cut him out, stamped a "hill" and glued the Santa down and added the sentiment. Simple as that! Of course I needed to add some glitter to the image too.

So here's the card, I hope you like it and don't forget to check out the Uniko Studio Blog and the rest of the design team blogs for more cards using the new Jolly Christmas Stamp Set.


Unfortunately I didn't have the time to record a video this time, but I'll record a video showing you all of the new stamps and a new card I've made later on this week.

Uniko Studio Blog (Bev)
Aimes
Amber
Gayatri
Nicki
Ren-Yi
Stacey
Taheerah

Wednesday, October 23, 2013

Black & White Doodle

Idag gjorde jag ett lite annorlunda kort som jag har tänkt göra länge. Satte mig ner och ritade och ritade och ritade och fick tillslut till en härlig blandning av figurer, former och mönster. Satte sedan ihop detta till ett kort. Tycker faktiskt att kortet blev riktigt bra och kommer nog att göra fler kort och annan konst på detta sätt.

Gillar ni kortet finns det även att köpa i min etsy shop craftbymarleene

-----------------

Made a new type of card today and I have to say I actually do like the result. I sat down with some markers and a piece of paper and started doodling. Eventually I ended up with an image that I liked and I made a card from it. I do think I'll be making more cards and art this way in the future.

Do you like it? You can buy this card in my etsy shop craftsbymarleene if you like. 


Tuesday, October 22, 2013

Tag Challenge #140

I don't know where times goes but I just seem to pass by so fast. Another week has gone and I just don't know where the last one went.

Since it is Tuesday again today it's time for another challenge over at SweetStamps.com and this time the theme is Tags. So I have made myself a bit of an "artsy" tag and I hope you like it.

I used Dylusion Spray Inks and Perfect Pearl Mists to make the background. Then I added some layers with a SweetCuts die and some Distress Ink. I put my sentiment in the bottom of the tag and embossed it heavily with white embossing powder. I also added some embossing powder to the whole tag to give if some more texture and interest.


As usual you can join the fun. Make sure to visit the SweetStamps blog for more information and the complete Challenge Rules.


Products from SweetStamps.com used on this card:

Sunday, October 20, 2013

Uniko Studio Sneak Peeks Day 2

Today I have a few more sneak peeks of the upcoming Uniko Studio release in a few days. Hope you enjoy.

Peek no.4 is of a little set which reflects the peaceful side of Christmas.


Peek no.5 is a very cute Christmas set and I have to say I just love it.

And, lastly is peek no.6 a much needed modern snowflake set.


That was all of the sneak peeks for this time. Tomorrow the product introductions will start and the design team will show some great cards using some of the stamps in this release.

And as I said yesterday you can win some awesome prizes, check out the Uniko Studio Blog for more information.

Saturday, October 19, 2013

Uniko Studio Sneak Peeks Day 1

A little later than normal, but it is almost time for another fabulous Uniko Studio release. 
As usual I'll will start with some sneak peeks and give you hints of what's to come. Then I'll will introduce the new items by showing you a few cards I've made with the different stamps in the new release. And finally when release day comes the DT will have a blog hop and show you all of the stamps and dies in this release. 

And as always don't miss out on all the fun and be sure to comment along the way and you can be the lucky winner of some mystery prizes from Uniko Studio. Check out the Uniko Studio Blog for more information.
So lets head on to todays peeks.


The first peek is of the next in the All Occasion Sentiments series, large fun & seasonal words to add to your Christmas creations.


 How about some Christmas Background Building? 
This second peek is a tiny one of what is contained in this set. So many options with this set along with some 2 step stamping fun!


The last peek I have to share with you today is of a Designer Die Collection.

It just wouldn't be Christmas without some snowslakes! This collection of dies have so many possibilities on their own, but pair them with some stamps & you might just end up snowed under with options! 

That's all the Sneak Peeks for today and I'll be back tomorrow with some more.

Friday, October 18, 2013

Uniko Studio Challenge No. 4 - Fall Foliage Color Inspiration

Today it is time for a Challenge over at Uniko Studio and this time the challenge is to make a card using the image on the bottom as inspiration. There are some beautiful fall colors there to use as inspiration.

I made my card using two stamp sets from Uniko Studio, some Distress Inks and some patterned papers I found in a drawer. I also recorded a video that I'll post in the bottom.

I hope you like the card and I hope you'll join the challenge and take a look at the Uniko Studio Blog for more inspiration and challenge rules. You can win some great prizes if you participate in the challenge.

Here is my card:


Uniko Studio Challenge

Here is the inspirational image used to make the card.


from Pinterest

YouTube Video:


Uniko Studio products used: